

Executing Distributed JMeter (Public Network)
Table of Contents
Intermediate - This article is part of a series.

This article is a branch of the previous post about distributed JMeter, but this time we’ll be working on a public network. Specifically, I’ll be using Amazon Web Services (AWS) for this example. The controller will be a Linux Ubuntu computer instead of a Windows one like the previous version. We’ll also be using security for RMI to prevent unwanted connections.
When would it be prudent to make this effort? #
Similar to the previous post, if you need to perform a load or stress test on between 2,000 and 8,000 threads or virtual users, I recommend using this approach. The difference would be that the previous approach could remain installed indefinitely in our local environment, but it probably wouldn’t be prudent to let this effort run beyond a couple of iterations or tests, because we would have to lease the public IP addresses necessary to get this model up and running. In short, it’s an environment that is built and destroyed on demand, which might not be optimal, but it’s a branch that deserves to be mentioned.
How does it work? #
It works in master-node mode, meaning that we require a node or server to act as a controller or orchestrator, and the remaining servers would be nodes or load injectors ( Load Generator). This scheme works on computers connected to the public network through a homologated network interface. This means that the computers have a homologated or subnetted IP but are exposed over a public IP address (as most Cloud SaaS providers do).
- Master aka Controller aka Orchestrator (Linux Ubuntu) x 1
- Java 1.8+
- JMeter 5.2.1
- Node aka Load Generator aka Load Injector (Linux Ubuntu) x 4
- Java 1.8+
- JMeter 5.2.1
This time, we’ll be using the same version of JMeter 5.2.1 and the same version of Java 1.8.252 on all computers, which is always recommended. If you have any questions about how to install JMeter, you can see the previous post or also welcome.
Recipe #
1.- Generate the RMI Keystore - Controller #
On the controller, we must generate the rmi_keystore.jks file. This file is necessary to carry out secure communication between the master and the nodes, which is why we must create it on the master and manually copy it to the nodes. It is best to use secure communication because we are working on the public network.
You can enter fictitious or real information to create the file. To do this, we need to run the shell script create-rmi-keystore.sh. If your controller is Windows, you would need to use the batch file create-rmi-keystore.bat. These files are located in the JMeter BIN folder.
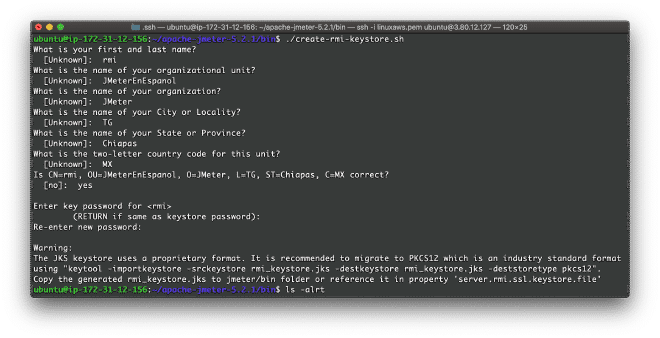
It is very important that you have the password handy, as it will be required when launching the services and performing the test. For this exercise, the default password was changeit. If everything went correctly, JMeter will have generated the file: rmi_keystore.jks in the BIN folder.
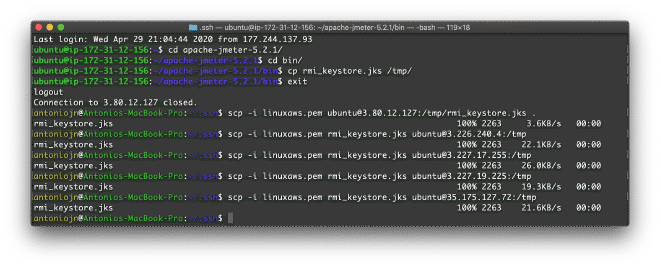
2.- Copy the Keystore - Nodes #
Copy this rmi_keystore.jks file to all nodes. You can use the scp command. In my case, since I use AWS keys through a PEM file, this allows me to sign in to the computers without having to type the password. To give you a more concrete idea, I will share the public IP addresses we will use for the exercise.
3.80.12.127   <-- Master or Controller
 3.226.240.4   <--\
 3.227.17.255  <--|\
 3.227.19.225  <--|/ Nodes
 35.175.127.72 <--/
In my case, I generated the RMI Keystore file on the controller, copied it to the temporary folder on the same server, and then copied it locally to my computer to distribute it to all the temporary folders on the nodes. Once signed locally on each node, the rmi_keystore.jks file must be placed in each JMeter BIN folder.
3.- RMI Service - Controller #
Let’s start the JMeter RMI service so the nodes can listen to the master. This time, we won’t edit the jmeter-service file as in step #9 of the previous post. This time, we’ll take advantage of the “parameter override” feature supported by Java. But first, we must position ourselves on any of the nodes, i.e., 3.226.240.4, we cannot use this IP address to launch the service because it is not approved, which is why we cannot perform BIND or bind this public IP to the service. We will have to use the approved IP of the network interface provided by the Amazon service. Again, we will obtain this IP address using the ifconfig command.

So the node’s approved IP is 172.31.2.210, before starting the service remember to complete the previous step and copy the rmi_keystore.jks file into the JMeter BIN folder.
nohup ./jmeter-server -Djava.rmi.server.hostname=172.31.2.210 &
3.226.240.4   <-- nohup ./jmeter-server -Djava.rmi.server.hostname=172.31.2.210 &
3.227.17.255  <-- nohup ./jmeter-server -Djava.rmi.server.hostname=172.31.12.246 &
3.227.19.225  <-- nohup ./jmeter-server -Djava.rmi.server.hostname=172.31.15.71 &
35.175.127.72 <-- nohup ./jmeter-server -Djava.rmi.server.hostname=172.31.6.59 &
If all went well, you’ll get something like this:
ubuntu@ip-172-31-2-210:~/apache-jmeter-5.2.1/bin$ tail -f nohup.out

Created remote object: UnicastServerRef2 [liveRef: [endpoint:[172.31.2.210:37567,SSLRMIServerSocketFactory(host=/172.31.2.210, keyStoreLocation=rmi_keystore.jks, type=JKS, trustStoreLocation=rmi_keystore.jks, type=JKS, alias=rmi),SSLRMIClientSocketFactory(keyStoreLocation=rmi_keystore.jks, type=JKS, trustStoreLocation=rmi_keystore.jks, type=JKS, alias=rmi)](local),objID:[3a50eccc:171c7f240a3:-7fff, 5307420091797206182]]]
If you did not use the default password when creating the file in step #1, you will need to update those values in the jmeter.properties file, i.e. server.rmi.ssl.keystore.password and server.rmi.ssl.truststore.password.
4.- Connectivity - Node - Controller #
Once the load generators or nodes are ready, each of them must be listening on port 1099. Before launching the test, it would be good to check the communication between the master and the nodes. To do this, we will use the telnet command. From the master, we will perform a connection test by executing telnet 3.226.240.4 1099:
ubuntu@ip-172-31-12-156:~/apache-jmeter-5.2.1/bin$ telnet 3.226.240.4 1099
Trying 3.226.240.4...
Connected to 3.226.240.4.
Escape character is '^]'.  <--- es importante que salga este simbolo, lo que significa que se estabelció la comunicación
Try the other nodes; I hope they all work correctly for you.
If you’re not sure how to generate it, trying to create a rule to allow all traffic might be easier.
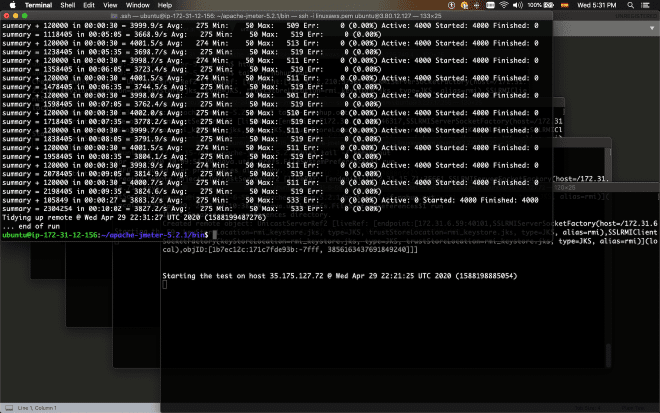
5.- Execution - Controller #
Now we’ll run the test via CLI from the controller or master server:
./jmeter.sh -n -t Script.jmx -l Script.jtl -R 3.226.240.4,3.227.17.255,3.227.19.225,35.175.127.72

Conclusion #
This mechanism is very similar to the previous one and works well on Azure and AWS, which are among the largest Cloud IaaS providers. I haven’t tested it on Google either, but I imagine it should work well. Similarly, as you can see, we are still performing manual tasks here that must be evaluated in terms of cost-benefit, especially for specializing in the model. In the next and final JMeter distributed release, we will publish the container-based distributed model, similarly utilizing cloud services.