

The Magic of the Precise Throughput Timer
Table of Contents
Intermediate - This article is part of a series.

In this entry, we explore the use of a timer that is characterized by sending transactions in a manner very similar to how real users would interact with an application. We begin by reviewing the types of timers available in JMeter.
Timer Categories #
JMeter offers two types of timers. One category is primarily used to insert pauses (called Think Time in English) between requests to emulate human behavior. This category includes the Constant Timer, Uniform Random Timer, Gaussian Random Timer, and others.
The second category consists of timers that aim to regularize the arrival rate of Threads (sessions), in other words, configure the desired throughput. This ratio of arrival is determined by the execution interval between threads (Vusers), which in English is known as pacing. Within this category are the Constant Throughput Timer and the Precise Throughput Timer.
NOTE: see my blog entries on pacing pacing-1 and pacing-2 regarding another technique for controlling arrival rate.
Load vs.Concurrency These two concepts are critical for understanding the difference in timer types usage.
| Load | Concurrency |
|---|---|
| Determined by the Pacing | Determined by the Think Time |
| Interval between user sessions | Interval between requests within a session |
Precise Throughput Timer (PTT) #
As previously mentioned, the Precise Throughput Timer (PTT) and Constant Throughput Timer (CTT) are designed to regularly schedule the arrival of threads (Vusers). The main difference between these two timers is that the CTT inserts a constant pause while the PTT inserts an random pause. This random pause models a Poisson distribution, which as has been demonstrated, is how users interact with an application.
PTT Configuration #
The configuration has two aspects. The first aspect involves the location of the element in the test plan. The timer should be included at the beginning of the Group of Threads below an action on Test Action (refer to the image below).
The second aspect is the configuration of the timer itself, which is based on a simple concept: setting the throughput goal/objective desired.
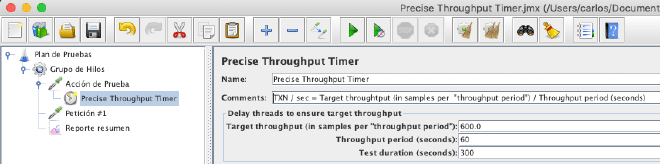
In the example, the desired Throughput (TXN/sec) is as follows:
Target Throughput (samples x "Throughput period") / Throughput period (secs)

600 TXN / 60 Segundos = 10 TXN por Segundo
Adicionalmente, es necesario asignar la duración del test: Test Duration en segundos.
With these parameters, the PTT creates (in memory/ RAM ) a dispatch scheme for how threads will be instantiated during the test.
Considerations #
- Use a normal Thread Group.
- Configure the Threads (Users) group with the necessary number of threads/vusers.
- Configure the Threads (Users) group with an Ramp-up and Startup delay equal to zero.
- Configure the Threads (Users) group with an infinite loop count.
- Configure the Threads (Users) group with the same duration (Test duration, mentioned previously).
- Do not use variables in the configuration.
NOTE: Consideration 2 is very important because without an adequate number of threads, the test cannot achieve the desired Throughput throughput. The suggestion is to observe the error log.
Conclusion #
The PTT timer offers a tool for designing a test that characterizes by sending transactions in a very similar way as real users use an application.