

Configuring Properties in JMeter
Table of Contents
Beginner - This article is part of a series.

In this entry, we present two options for initializing properties in JMeter.
We start by defining what is a property. In JMeter, a property is a dynamic value that is common to all threads/VUsers. Usually it is used to define specific information for the execution environment of a test. Accessing properties is through the function __P(). For example, the property PropX will be read using ${__P(PropX)}.
NOTE: In my last blog, I mentioned two good practices related to this topic:
Use the Non-GUI mode (CLI) Variables and Properties
Importance #
The ability to initialize properties has the important advantage of allowing you to modify the behavior of the script externally and dynamically. For example, suppose we have a script that tests the performance of an application on the Web. During the development of this application, the test can initially be directed to the development environment, and later to the QA environment. In this case, using a property to configure the script, we can alter the URL representing the testing environment without needing to edit or modify the script directly.
Example #
In the following diagram, we initialize a thread group using three properties:
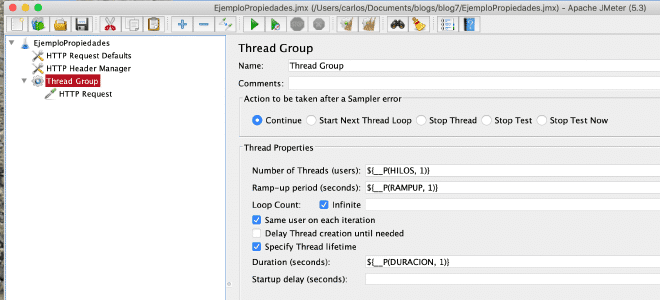
NOTE: Properties can be used to configure multiple elements in a test plan (timers, variables, loops, etc).
First Option: Initialize Properties via Command Line (CLI) #
The first option is to initialize properties through this method in the command line of this application:
jmeter -n -t EjemploPropiedades.jmx -J HILOS=100 -J RAMPUP=10 -J DURACION=600
In this example, we are assigning values to the properties THREADS, RAMPUP, and DURATION.
Second Option: Using a Properties File #
In this option, properties are included in an file as follows:
First, we create an file called pruebaQA_05-12-20.properties with the properties to initialize:
#######################################
 # Ambiente QA: propiedades específicas
 HILOS=100
 RAMPUP=10
 DURACION=600
 #######################################
Secondly, we use this file in the command line (CLI):
jmeter -p pruebaQA_05-12-20.properties -n -t EjemploPropiedades.jmx
In this case, the variables are initialized using the values contained in the properties file.
NOTE: While it is possible to include these properties directly in the file user.properties (located in the $JMETER_HOME/libexec/lib directory), my opinion favors placing the file in the same location as the test scripts.
What is the best option? #
For the following reasons, the best option is to use a properties file.
- Flexibility: we can create property files for different purposes: to define specific test environments, to alter the number of users and threads, to set the duration of the test, etc.
- Documentation: allows documenting properties in detail for each test.
- Productivity: a script can be used in multiple tests by alternating the property file.
More Flexibility #
For greater flexibility, it is possible to use a combination of assigning properties on the command line with using a property file. For example,
jmeter -p pruebaQA_05-12-20.properties -n -t EjemploPropiedades.jmx -J HILOS=200
In this case, the value of the HILOS property replaces the one assigned in the previously mentioned properties file. The rest of the properties remain unchanged.
Conclusion #
The use of properties to modify a script’s behavior provides flexibility, productivity, and documentation that results in a significant increase in the efficiency of load testing execution.